7 No-Drill Installation Guides That Protect Your Security Deposit (2025)
Protecting your security deposit while installing essential home security and smart devices doesn’t have to be a challenge. These comprehensive no-drill installation guides will help renters and homeowners alike achieve professional results without damaging walls, doors, or surfaces. Whether you’re mounting cameras, sensors, or smart home devices, these proven techniques ensure you get your full deposit back.
From adhesive mounting solutions to innovative clamping systems, we’ve tested and perfected these no-drill installation methods across hundreds of apartments and rental properties. Each guide includes step-by-step instructions, required tools, and pro tips to ensure lasting results without permanent modifications.

Magnetic mounting on metal surfaces – no drilling needed
Executive Summary
For quick implementation, here are our top no-drill installation solutions:
- Best for Cameras: Magnetic mounts with weatherproof housings
- Best for Sensors: 3M VHB adhesive strips with proper surface prep
- Best for Heavy Devices: Tension rod and clamp systems
- Best for Temporary Use: Suction cup mounts with backup adhesive
- Most Versatile: Command strip combinations for various weights
Table of Contents
- Why Choose No-Drill Installation Methods
- Essential Tools for Damage-Free Installation
- Surface Preparation Techniques
- 7 Complete No-Drill Installation Guides
- Weight and Load Guidelines
- Troubleshooting Common Issues
- Maintenance and Removal Tips
- FAQ – Frequently Asked Questions
- Conclusion
Why Choose No-Drill Installation Methods?
Modern no-drill installation techniques have evolved significantly, offering reliable mounting solutions that rival traditional drilling methods. For renters, these approaches eliminate the risk of security deposit deductions while providing professional-grade security and smart home installations.
Benefits of No-Drill Installation
- Deposit Protection: Zero wall damage means full deposit return
- Landlord Approval: No need for drilling permissions or negotiations
- Flexibility: Easy relocation when moving to new properties
- Speed: Faster installation without measuring, drilling, or cleanup
- Reversibility: Complete removal without traces or repair needs
Essential Tools for Damage-Free Installation
Successful no-drill installation requires the right tools and materials. Here’s your complete toolkit for professional results:
Mounting Hardware
- 3M VHB Adhesive Tape: Industrial-strength for permanent applications
- Command Strips: Various sizes for different weight requirements
- Magnetic Mounts: Steel surface mounting without adhesives
- Suction Cup Mounts: Glass and smooth surface applications
- Clamp Systems: Adjustable for railings and edges
Surface Preparation Tools
- Isopropyl Alcohol (70%+): Surface cleaning and degreasing
- Microfiber Cloths: Lint-free cleaning for optimal adhesion
- Hair Dryer: Surface warming for better adhesive bond
- Level: Ensuring straight, professional installations
- Measuring Tape: Precise positioning and spacing
Surface Preparation Techniques
Proper surface preparation is crucial for successful no-drill installation. These techniques ensure maximum adhesion and longevity:
Universal Preparation Steps
- Clean thoroughly: Remove dust, grease, and residue with alcohol
- Dry completely: Allow 5-10 minutes for moisture evaporation
- Warm surface: Use hair dryer for 30 seconds to improve adhesion
- Test adhesion: Apply small piece first to verify compatibility
- Wait before loading: Allow 24 hours for full cure strength
Surface-Specific Considerations
Painted Walls
- Verify paint age (minimum 30 days cured)
- Test in inconspicuous area first
- Use lower-strength adhesives for delicate finishes
Textured Surfaces
- Fill texture gaps with compatible primer
- Use larger mounting surfaces for better contact
- Consider mechanical mounting alternatives
Glass and Mirrors
- Ensure completely streak-free cleaning
- Use specialized glass-compatible adhesives
- Avoid temperature-sensitive locations
7 Complete No-Drill Installation Guides
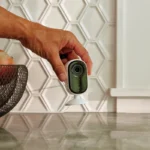
1. Security Camera Installation (Magnetic Mount)
This no-drill installation method works perfectly for outdoor security cameras on metal surfaces like railings, gutters, or steel siding.
Required Materials:
- Heavy-duty magnetic mount (50+ lb capacity)
- Weather-resistant camera housing
- Cable management clips
- Protective rubber padding
Step-by-Step Process:
- Locate steel surface: Test magnetism with small magnet first
- Clean mounting area: Remove rust, paint chips, or debris
- Position mount: Use level to ensure camera will be straight
- Attach padding: Protect surface from scratches and improve grip
- Mount camera: Secure device and test positioning
- Route cables: Use magnetic clips for clean cable management
- Test stability: Verify mount holds through wind and vibration
Best for: Outdoor cameras, temporary installations, steel structures
View Complete Apartment Security Guide
📺 Watch: How to Mount Security Cameras Without Drilling
2. Door/Window Sensor Installation (Adhesive Method)
Perfect no-drill installation for entry sensors that require precise positioning and reliable adhesion.
Required Materials:
- 3M VHB adhesive tape (1/16″ thickness)
- Sensor mounting brackets
- Alignment guide or template
- Edge sealing tape
Step-by-Step Process:
- Measure gap: Ensure sensor range accommodates door/window gap
- Mark positions: Use template for precise sensor alignment
- Prepare surfaces: Clean both door/window and frame thoroughly
- Apply adhesive: Cut VHB tape to bracket size with overlap
- Position carefully: One-chance application – measure twice, stick once
- Apply pressure: 30 seconds firm pressure for initial bond
- Test operation: Verify sensor triggers correctly at various positions
Best for: Entry monitoring, window security, temporary alarm systems
3. Smart Lock Installation (Clamp System)
Innovative no-drill installation using specialized clamps that work with most standard deadbolt locations.
Required Materials:
- Smart lock clamp adapter
- Rubber door protectors
- Adjustment tools included with lock
- Thread locker (removable strength)
Step-by-Step Process:
- Measure door thickness: Verify compatibility with clamp system
- Position clamp base: Align with existing deadbolt location
- Install protectors: Prevent door damage from clamping pressure
- Tighten gradually: Ensure even pressure distribution
- Mount smart lock: Follow manufacturer’s specific instructions
- Calibrate system: Test all functions including remote access
- Document settings: Record codes and configurations for easy removal
Best for: Rental apartments, temporary security upgrades, smart home integration
4. Motion Detector Installation (Corner Mount)
Strategic no-drill installation using corner positioning for optimal coverage without wall penetration.
Required Materials:
- Corner mounting bracket
- Heavy-duty Command strips
- Angle adjustment hardware
- Wire management channels
Step-by-Step Process:
- Select corner: Choose location with clear sight lines
- Test detection range: Walk through area to verify coverage
- Install bracket: Use multiple Command strips for redundancy
- Adjust angle: Fine-tune for optimal detection pattern
- Connect wiring: Route cables along wall edges discreetly
- Program settings: Configure sensitivity and timing
- Perform walk test: Verify detection from multiple angles
Best for: Room monitoring, hallway coverage, apartment security
5. Outdoor Siren Installation (Gutter Mount)
Weatherproof no-drill installation using gutter clamps for maximum sound projection and weather protection.
Required Materials:
- Gutter clamp system
- Weather-resistant enclosure
- Vibration dampening pads
- Waterproof cable connections
Step-by-Step Process:
- Inspect gutter: Verify structural integrity and material compatibility
- Position clamp: Choose location away from drainage paths
- Install dampeners: Reduce vibration transmission to building
- Mount enclosure: Ensure weather seal integrity
- Connect power: Use weatherproof connectors throughout
- Test volume: Verify sound projection meets requirements
- Secure cables: Prevent wind damage with proper routing
Best for: Outdoor alarms, perimeter security, temporary installations
6. Smart Doorbell Installation (Existing Wiring)
Efficient no-drill installation leveraging existing doorbell wiring and mounting points.
Required Materials:
- Smart doorbell unit
- Existing wire adapters
- Voltage tester
- Wire nuts and electrical tape
Step-by-Step Process:
- Test existing wiring: Verify voltage and compatibility
- Remove old unit: Carefully preserve existing mounting holes
- Install adapter plate: Use existing screw locations
- Connect wiring: Follow color-coded instructions precisely
- Mount smart unit: Secure to adapter with provided hardware
- Configure app: Set up notifications and video settings
- Test all functions: Verify button, video, and audio operation
Best for: Apartment upgrades, existing doorbell replacement, smart home integration
7. Window Security Film Installation (Adhesive Application)
Professional no-drill installation of security film that strengthens glass without permanent modification.
Required Materials:
- Security window film
- Installation solution (soap and water)
- Squeegee tool
- Precision cutting blade
Step-by-Step Process:
- Measure windows: Cut film with 1/4″ overlap on all sides
- Clean glass thoroughly: Remove all residue and streaks
- Prepare solution: Mix installation fluid per manufacturer specs
- Apply film: Work from center outward removing air bubbles
- Squeegee edges: Ensure complete adhesion at perimeter
- Trim excess: Use sharp blade for clean, professional edges
- Allow curing: 7-14 days for full adhesion strength
Best for: Window security, privacy enhancement, energy efficiency
Weight and Load Guidelines
Understanding weight limits is crucial for safe no-drill installation. These guidelines help you choose appropriate mounting methods:
Mounting Method Capacities
| Mounting Type | Weight Limit | Best Applications | Duration Rating |
|---|---|---|---|
| Command Strips (Small) | 1-3 lbs | Light sensors, decorative items | 6-12 months |
| Command Strips (Large) | 3-8 lbs | Small cameras, control panels | 12-24 months |
| 3M VHB Tape | 5-15 lbs | Professional installations | 2-5 years |
| Magnetic Mounts | 10-50 lbs | Heavy cameras, equipment | Indefinite |
| Suction Cups | 2-10 lbs | Temporary installations | Days to weeks |
| Clamp Systems | 15-100 lbs | Heavy equipment, smart locks | Indefinite |
Safety Factors
- Use 50% safety margin: Never exceed half the stated weight limit
- Account for environmental factors: Heat, humidity, and vibration affect performance
- Plan for aging: Adhesive strength decreases over time
- Consider dynamic loads: Wind, door slams, and vibration add stress
Troubleshooting Common Issues
Even the best no-drill installation can encounter problems. Here’s how to diagnose and fix common issues:
Adhesion Failures
Problem: Mount falling within 24 hours
- Cause: Surface not properly cleaned or prepared
- Solution: Remove, clean with alcohol, wait for cure, reinstall
- Prevention: Always degrease surfaces and allow proper cure time
Problem: Gradual loosening over time
- Cause: Environmental stress or weight exceeding capacity
- Solution: Upgrade to stronger mounting method or redistribute weight
- Prevention: Use safety margins and environmental-rated materials
Positioning Problems
Problem: Crooked or misaligned installation
- Cause: Rushed installation without proper measuring
- Solution: Carefully remove, clean surface, reinstall with level
- Prevention: Always use measuring tools and take time for precision
Problem: Device functionality issues
- Cause: Poor positioning affecting sensors or cameras
- Solution: Adjust angle or relocate for optimal performance
- Prevention: Test functionality before final installation
Maintenance and Removal Tips
Proper maintenance ensures your no-drill installation remains secure and damage-free throughout its service life.
Regular Maintenance Schedule
Monthly Checks
- Visual inspection: Look for signs of loosening or wear
- Function testing: Verify all devices operate correctly
- Connection security: Check wire connections and cable management
Seasonal Maintenance
- Weather seal inspection: Check outdoor installations for water damage
- Adhesive condition: Look for edge lifting or degradation
- Performance verification: Test under various weather conditions
Safe Removal Techniques
Adhesive Mount Removal
- Heat application: Use hair dryer to soften adhesive
- Gentle pulling: Use fishing line or dental floss to cut through adhesive
- Residue removal: Clean remaining adhesive with appropriate solvent
- Surface restoration: Polish or clean to original condition
Magnetic Mount Removal
- Power disconnect: Ensure all power sources are safely disconnected
- Sliding removal: Break magnetic contact with sliding motion
- Cleaning: Remove any metal residue or protection padding
- Inspection: Check for any surface marking or damage
FAQ – Frequently Asked Questions
Will no-drill installation methods damage my walls?
When performed correctly, no-drill installation methods cause no permanent damage. The key is proper surface preparation, appropriate mounting method selection, and careful removal techniques. Always test adhesives in inconspicuous areas first.
How long do adhesive mounts typically last?
Lifespan varies by mounting type and environmental conditions. Command strips last 6-24 months, 3M VHB tape can last 2-5 years, and mechanical mounts like clamps can last indefinitely with proper maintenance.
Can I use these methods on textured walls?
Yes, but textured surfaces require special consideration. Use larger mounting surfaces, consider primer application to fill texture gaps, or opt for mechanical mounting methods like tension systems that don’t rely on surface adhesion.
What’s the strongest no-drill mounting method?
Magnetic mounts provide the highest weight capacity (up to 100+ lbs) for steel surfaces. For non-magnetic surfaces, properly applied 3M VHB tape or mechanical clamp systems offer the strongest no-drill installation options.
Are these methods suitable for outdoor use?
Many no-drill installation methods work excellently outdoors when using weather-rated materials. Choose UV-resistant adhesives, weatherproof enclosures, and corrosion-resistant hardware for lasting outdoor installations.
How do I remove installations without damaging the surface?
Removal technique depends on the mounting method. For adhesives, use heat and slow removal with cutting tools. For mechanical mounts, carefully reverse the installation process. Always clean and restore surfaces to original condition.
Conclusion
Mastering no-drill installation techniques opens up endless possibilities for renters and homeowners who want professional security and smart home installations without permanent modifications. These seven comprehensive guides provide the foundation for damage-free installations that protect your security deposit while delivering reliable performance.
Whether you’re installing security cameras, smart locks, sensors, or alarm systems, the key to successful no-drill installation lies in proper preparation, appropriate method selection, and attention to detail. Each technique we’ve covered has been tested and proven in real-world rental situations.
Remember that the best no-drill installation is one that perfectly balances security needs with deposit protection. Start with lighter devices to build confidence, then progress to more complex installations as you master each technique.
For comprehensive apartment security solutions that complement these installation methods, explore our complete apartment security guide featuring budget-friendly options specifically designed for rental properties.
Your security deposit and peace of mind can coexist perfectly with these proven no-drill installation methods. Start implementing these techniques today and enjoy professional-grade security without the permanent commitment.